Long story short? I made an RPi sound clip player using a tft touchscreen, pygame, and movie quotes found on YouTube. It starts with a small, 3.5″ touchscreen whose drivers are installed using the instructions here. For your convenience, they are replicated below.
Just enter these lines into Terminal to get the screen set up.
sudo rm -rf LCD-show
git clone https://github.com/goodtft/LCD-show.git
chmod -R 755 LCD-show
cd LCD-show/
sudo ./LCD35-show
This should get the screen running properly. If you have issues with axes being reversed on the screen (like you touch the right side and the cursor shows up on the left) the page linked above has some suggestions. If those don’t help, check out Teng Fone’s post on Medium.
OK, now (hopefully) the screen is working and we can work on the code. I used code from Garth Vander Houwen’s Pi tft menu project as a starting point, added some audio files, and came up with a project that presently shows this screen on my Raspberry Pi:
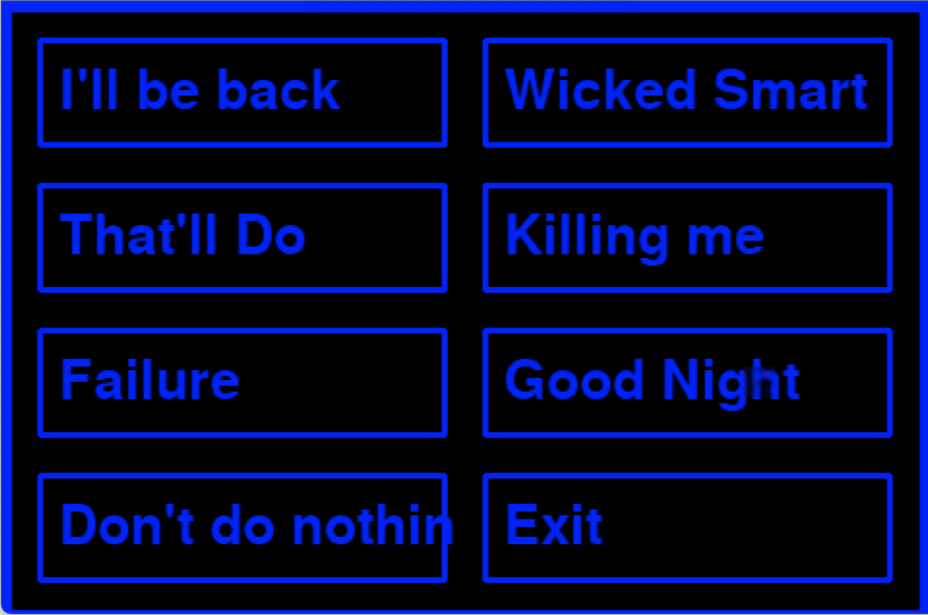
You might guess some (or all) of the audio files I used. If not, you can download them from here.
The Python script to get it all running is below (or access it here). Connect the audio output to your speakers or headphones and click away. Examining the code should make it relatively easy to modify it to change the sounds, number of options, etc.
import sys, pygame, time, subprocess, os
from pygame.locals import *
from pygame import mixer
from subprocess import *

os.environ["SDL_FBDEV"] = "/dev/fb1"
os.environ["SDL_MOUSEDEV"] = "/dev/input/touchscreen"
os.environ["SDL_MOUSEDRV"] = "TSLIB"

# Initialize pygame modules individually (to avoid ALSA errors) and hide mouse
pygame.font.init()
pygame.display.init()
pygame.mouse.set_visible(0)
pygame.display.toggle_fullscreen

# define function for printing text in a specific place with a specific width and height with a specific colour and border
def make_button(text, xpo, ypo, height, width, colour):
    font=pygame.font.Font(None,42)
    label=font.render(str(text), 1, (colour))
    screen.blit(label,(xpo,ypo))
    pygame.draw.rect(screen, blue, (xpo-10,ypo-10,width,height),3)

# define function for printing text in a specific place with a specific colour
def make_label(text, xpo, ypo, fontsize, colour):
    font=pygame.font.Font(None,fontsize)
    label=font.render(str(text), 1, (colour))
    screen.blit(label,(xpo,ypo))

# define function that checks for touch location
def on_touch():
    # get the position that was touched
    touch_pos = (pygame.mouse.get_pos() [0], pygame.mouse.get_pos() [1])
    #  x_min                 x_max   y_min                y_max
    # button 1 event
    if 30 <= touch_pos[0] <= 240 and 30 <= touch_pos[1] <=85:
            button(1)
    # button 2 event
    if 260 <= touch_pos[0] <= 470 and 30 <= touch_pos[1] <=85:
            button(2)
    # button 3 event
    if 30 <= touch_pos[0] <= 240 and 105 <= touch_pos[1] <=160:
            button(3)
    # button 4 event
    if 260 <= touch_pos[0] <= 470 and 105 <= touch_pos[1] <=160:
            button(4)
    # button 5 event
    if 30 <= touch_pos[0] <= 240 and 180 <= touch_pos[1] <=235:
            button(5)
    # button 6 event
    if 260 <= touch_pos[0] <= 470 and 180 <= touch_pos[1] <=235:
            button(6)
    # button 7 event
    if 30 <= touch_pos[0] <= 240 and 255 <= touch_pos[1] <=310:
            button(7)
    # button 8 event
    if 260 <= touch_pos[0] <= 470 and 255 <= touch_pos[1] <=310:
            button(8)

# Define each button press action
def button(number):
    print("You pressed button", number)

    if number == 1:
        #time.sleep(0.2) #do something interesting here
	mixer.init()
	mixer.music.load('Illbeback.mp3')
	mixer.music.set_volume(1)
	mixer.music.play()
	time.sleep(5)
        #sys.exit()

    if number == 2:
        #time.sleep(5) #do something interesting here
        #sys.exit()
	mixer.init()
        mixer.music.load('wickedsmart.mp3')
        mixer.music.set_volume(1)
        mixer.music.play()
        time.sleep(5)

    if number == 3:
        #time.sleep(5) #do something interesting here
        #sys.exit()
	mixer.init()
        mixer.music.load('thatlldopig.mp3')
        mixer.music.set_volume(1)
        mixer.music.play()
        time.sleep(5)

    if number == 4:
        #time.sleep(5) #do something interesting here
        #sys.exit()
	mixer.init()
        mixer.music.load('killingmesmalls.mp3')
        mixer.music.set_volume(1)
        mixer.music.play()
        time.sleep(5)

    if number == 5:
        #time.sleep(5) #do something interesting here
        #sys.exit()
	mixer.init()
        mixer.music.load('failuretocommunicate.mp3')
        mixer.music.set_volume(1)
        mixer.music.play()
        time.sleep(5)

    if number == 6:
        #time.sleep(5) #do something interesting here
        #sys.exit()
	mixer.init()
        mixer.music.load('goodafternoon.mp3')
        mixer.music.set_volume(1)
        mixer.music.play()
        time.sleep(5)

    if number == 7:
        time.sleep(2) #do something interesting here
        #sys.exit()

    if number == 8:
        time.sleep(5) #do something interesting here
        sys.exit()

#colors     R    G    B
white   = (255, 255, 255)
red     = (255,   0,   0)
green   = (  0, 255,   0)
blue    = (  0,   0, 255)
black   = (  0,   0,   0)
cyan    = ( 50, 255, 255)
magenta = (255,   0, 255)
yellow  = (255, 255,   0)
orange  = (255, 127,   0)

# Set up the base menu you can customize your menu with the colors above

#set size of the screen
size = width, height = 480, 320
screen = pygame.display.set_mode(size)

# Background Color
screen.fill(black)

# Outer Border
pygame.draw.rect(screen, blue, (0,0,480,320),10)

# Buttons and labels
# First Row
make_button("I'll be back", 30, 30, 55, 210, blue)
make_button("Wicked Smart", 260, 30, 55, 210, blue)
# Second Row
make_button("That'll Do", 30, 105, 55, 210, blue)
make_button("Killing me", 260, 105, 55, 210, blue)
# Third Row
make_button("Failure", 30, 180, 55, 210, blue)
make_button("Good Night", 260, 180, 55, 210, blue)
# Fourth Row
make_button("Don't do nothin", 30, 255, 55, 210, blue)
make_button("Exit", 260, 255, 55, 210, blue)

#While loop to manage touch screen inputs
while 1:
    for event in pygame.event.get():
        if event.type == pygame.MOUSEBUTTONDOWN:
            pos = (pygame.mouse.get_pos() [0], pygame.mouse.get_pos() [1])
            on_touch()

        #ensure there is always a safe way to end the program if the touch screen fails
        if event.type == KEYDOWN:
            if event.key == K_ESCAPE:
                sys.exit()
    pygame.display.update()
    ## Reduce CPU utilisation
    time.sleep(0.1)