Preventing Problems while Permanently Storing Grades in PowerSchool

Peculiar enrollment situations can lead to issues when permanently storing grades at the end of a term. For instance, if a student changes from one section of a course to another during a term, one grade could get stored for each section if the “Exclude enrollments” dates are not selected wisely.

"Exclude Enrollments" options

While we keep a file of “Special Cases” to review at the end of each term, but there are often such cases that sneak by us. To catch them, I track down all enrollment anomalies before storing grades.

To do this, I use DDE (…/admin/tech/dde/):

In DDE:

  • Select the CC table
  • TermID >= current year term (2900, 3000, 3001, etc.)
  • SchoolID = 200 for MS or 300 for HS (in our case)
  • DateEnrolled >= “A couple weeks after the start of the term”
  • Export to a spreadsheet
  • Sort by course name and delete non-courses: clubs, sports, A-Block, etc.
  • Sort by DateEnrolled and look for any peculiar dates later in the term
  • Decide appropriate cutoff date for “enrolled… after”
  • Note any enrollments that may be improperly included or rejected for later followup
  • Repeat above steps changing DateEnrolled to DateLeft and find an appropriate time for “dropped… before”

I typically check “Exclude … dropped before…” about a week before the end of the current term. Checking for outlier dates can help identify individual students and enrollments that may need attention.

Air Quality Monitoring on a Corporate Scale

NOTE: This project started out small, simple, easy-peasy. It has expanded well beyond what can comfortably be contained in a single blog post. If you’re looking into setting up air monitoring on your campus, I would be very happy to help you as much as you’d like – from a general “Here’s a website to look at” to a complete “Here’s a fully functional pm2.5/pm10/temp/humidity/barometric pressure sensor and dashboard”, I’m probably the guy you want to talk to.
My current setups use $75 DYI sensors as well as a multi-thousand dollar commercial sensor, Python scripts, api calls, HTML, CSS, Google Sheets, and JavaScript to create responsive displays showing current and recent AQI readings. Let me know if you have any questions or would like some help. Otherwise, feel free to continue on to the post I made a few years back . . .


South Korea doesn’t have the worst air in the world, but it’s also no Chippewa Falls, Wisconsin. Recognizing that very bad air days are a threat to the health of our students and staff, our school developed a systematic plan to monitor the air we breath and to filter bad air when necessary. As part of this effort, several staff, faculty and students worked together to build a network of air quality monitoring stations around campus to collect timely data, share current data with stakeholders, and record data long-term for research and future planning. These devices are surprisingly accurate except during times of high humidity when the SDS011’s readings become unreliable. Ultimately, the school’s brass decided to go with a commercially available system for it’s needs. But I have preserved the following explanation of how we built the devices and installed the software to disseminate current data and stored data for future use.

We built a variation of the Sensor.Community’s project. This uses the Plantar SDS011 PM2.5/PM10 particulate matter detector, BME280 temperature/humidity/pressure monitor, the WEMOS D1 Mini ESP8266 development board and a super small breadboard to bring it all together. Note that these items can also be commonly found virtually anywhere that sells microelectronics components and they’re inexpensive. The SDS011 sensor is around $17, the others are a few dollars each.

Setup is fairly straightforward. We attach headers to the Wemos D1 Mini and the BME280. Then we connect the 5V pin of the D1 to the 5V pin of the SDS011,

Wiring Connections:

Wemos D1 MiniSDS011BME280
5V5V
3.3VVIN
D1TXD
D2RXD
D3SDA
D4SCL
GNDGND
Sensor wiring connections

Once everything is connected, we’ll want to flash the Wemos D1 Mini’s code. Visit the Sensor.Community’s download page to retrieve the appropriate version. Connect the Wemos D1 to your computer, and run the flashing program to set it up. If your computer does not recognize the Wemos D1, you may need to install the driver to see it. The driver page is mostly in Chinese, so you will need to look closely to discern which version is needed for your OS.

Once flashed, you’ll need to reboot the device by disconnecting from your computer and then reconnecting – either to your computer or another micro-USB power source.

The first time it restarts, it won’t know how to connect to your local WiFi, so it creates its own WiFi network. On your computer, look for a new SSID that begins with Feinstaubsensor-ID or airRohr-ID followed by a chip ID such as 13597771. Connect to that SSID and note the chip ID as it will be needed later. Once connected, point your browser to 192.168.4.1 and you should see the device setup page. From here, you can select your preferred language, enter your local WiFi network name and password, and identify the sensors connected to the device. Be sure to click the “Zurük zur Starseite” button to save the settings and restart the device.

There are are a couple ways to check your sensor readings. You can access your device directly on your local network if you can identify and visit its local ip address. Alternatively, you can create an account at https://sensor.community to conveniently access your device data online. You’ll need the Chip ID you wrote down earlier to find your sensors. But once your account is set up, you’ll be easily able to bookmark your device to see your local air quality, temperature and humidity conditions.

Receive Raspberry Pi’s ip address on boot

I do a lot of Raspberry Pi projects – often creating them in one place and using them in another. While it is easy enough to use SSH, VNC or HTML to access a device, if it’s being moved from one network to another, it can be challenging to know its ip address. Sure, you may be able to log into a local router and look it up, but I thought it would be easier if I just had the RPi email me with its current ip address.

Thankfully, Cody Giles created a tutorial on elinux.com outlining how to do this. His Python script runs on the RPi on startup, finds its ip address(es) and then emails this information to a predetermined address. I started with his code, but ended up changing it to meet my needs.

In order to allow a Python script to send email through a Gmail account, you may need to enable an “App Password” for your sending account.

Step #1: Create the Python Script

Copy the following and paste it into a text editor. You must change the ‘to’ address, as well as the ‘gmail_user’ and ‘gmail_password’ for the sending account in the lines below the pound sign lines about 25 lines from the top. Save this file as a python script in the home directory named startup_email.py.

import subprocess
import smtplib
from email.mime.text import MIMEText
import datetime
import os

# Account Information
##################################################################
to = 'recipientemail@server.com' # Email to send to.
gmail_user = 'senderaddress@gmail.com' # Email to send from. (MUST BE GMAIL)
gmail_password = 'emnopqoodnzcvkir' # Gmail app password.
smtpserver = smtplib.SMTP('smtp.gmail.com', 587) # Server to use.

smtpserver.ehlo()  # Says 'hello' to the server
smtpserver.starttls()  # Start TLS encryption
smtpserver.ehlo()
smtpserver.login(gmail_user, gmail_password)  # Log in to server
today = datetime.date.today()  # Get current time/date

arg='ip route list'  # Linux command to retrieve ip addresses.
# Runs 'arg' in a 'hidden terminal'.

p=os.popen("ifconfig | grep 'inet '").read()
#data = p.communicate()  # Get data from 'p terminal'.

print("p=")
print(p)
print("END p")

iplist = os.system("ifconfig | grep 'inet '");
print("iplist = "+str(iplist))
print("******************")
print(iplist)

# Creates the text, subject, 'from', and 'to' of the message.
msg = MIMEText("IP Addresses:" + "\n" + str(p))
msg['Subject'] = 'IPs For RaspberryPi on %s' % today.strftime('%b %d %Y')
msg['From'] = gmail_user
msg['To'] = to
# Sends the message
smtpserver.sendmail(gmail_user, [to], msg.as_string())
# Closes the smtp server.
smtpserver.quit()

Step #2: Make the script executable.

Using Terminal, navigate to the home directory and make the script executable.

cd ~
sudo chmod +x startup_email.py

Setp #3: Run the Script on Startup.

We’ll add a line to boot.rc to run the script whenever the RPi boots.

sudo nano /boot/boot.rc

Add the following lines to boot.rc

python /home/pi/Code/startup_email.py

Now, reboot the Pi and in about a minute, you should receive an email with your device’s IP address.

Forcing DNS on macOS in Recovery Mode

When resetting a 2020 MacBook Air, we ran into an issue where the device just wouldn’t connect to Apple’s servers. It felt like a DNS issue, but I couldn’t find a way to see or set DNS values. After some searching, I came across this Stack Overflow post with the solution. As that site was sold to a tech investment firm in June, 2021 (promising not to change a thing), I thought it best to preserve it here.


Here it is:

Usually DNS-server setup in the shell is done with sudo networksetup ... – a tool not available in the Base OS X System of the Recovery Mode.

You should still be able to change the DNS server with scutil in Terminal.app:

  1. Open Terminal.app in the menubar > Utilities
  2. Enter scutil --dns to get your current DNS config
  3. Enter scutil to reach interactive mode
  4. Enter list to get a list of all keys in the data store
  5. If you have several interfaces (you’ve found several State:/Network/Service/SERVICE_ID/IPv4 entries) determine the one connected to the Internet (based on e.g. your router and its internal network IP settings) – example:get State:/Network/Service/EB40E2FC-8248-48F2-8567-257D940A31EB/IPv4 d.show Example output:<dictionary> { Addresses : <array> { 0 : 192.168.0.8 } ConfigMethod : Manual SubnetMasks : <array> { 0 : 255.255.255.0 } } If your router has the IP-address 192.168.0.1 this should be the proper interface. If your router has e.g. the IP address 192.168.1.1 the interface found above would be the wrong one and you have to search for an interface with an IP in the range 192.168.1.2-192.168.1.254.
  6. Enter get State:/Network/Service/EB40E2FC-8248-48F2-8567-257D940A31EB/DNS use the service ID of the interface connected to the Internet you have found previously (here EB40E2FC-8248-48F2-8567-257D940A31EB)Entering d.show should show something like:<dictionary> { SearchDomains : <array> { 0 : some.domain } ServerAddresses : <array> { 0 : 192.168.0.1 } } Depending on the DHCP setup of your router the SearchDomains entry and array may be missing.
  7. Enter d.add ServerAddresses * 8.8.8.8 9.9.9.9 – add one or more DNS-server (here Google’s 8.8.8.8 and quad9’s 9.9.9.9)
  8. Enter set State:/Network/Service/EB40E2FC-8248-48F2-8567-257D940A31EB/DNS
  9. Enter d.show to check the modified dict entry. It should show something like:<dictionary> { SearchDomains : <array> { 0 : some.domain } ServerAddresses : <array> { 0 : 8.8.8.8 1 : 9.9.9.9 } }
  10. Enter quit to leave the interactive mode of scutil and return to the shell.
  11. Enter scutil --dns or dig to verify your new DNS config.

KIS/KORCOS Disc Golf Scorekeeping with Google Forms and Sheets

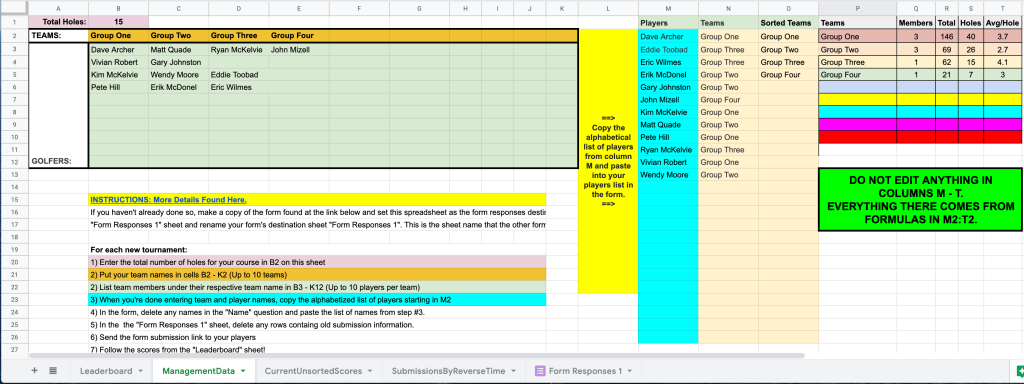
We put together a disc golf tournament scoring system using a Google form and some spreadsheet magic for golf tournament organizers. The organizer can enter the number of holes, teams, and golfer names into a spreadsheet which creates a convenient alphabetized list of golfers’ names. This list of names can be copied and pasted into a pre-made Google form.

The form allows golfers or managers to select a golfer and enter score(s) for any hole(s) that have been completed. The form’s spreadsheet automagically tallies the scores for each player and team, creating tables for both individual and team leaderboards. If an error is made entering any score(s), one can just go back and re-enter the score for the affected hole(s) and all is good again. The spreadsheet uses the most recent score for each golfer on each hole and ignores previous entries.

Instructions are found below and can be found in this Google doc.

Note: do not edit anything except what is in the instructions below. There are a few extra sheets (Leaderboard, CurrentUnsortedScores, SubmissionsByReverseTime) that are made up entirely of formulas using data from the ManagementData and Form Response tabs. If anything is wrong, it is almost certainly in the ManagementData tab not in the other sheets.

  1. Click this link to make a copy of the form
  2. Click this link to make a copy of the spreadsheet
  3. In the form, click on the “Responses” link, then the green spreadsheet icon on the right, and click “Select response destination”.
  4. Select the spreadsheet that you copied from the link above
  5. When you selected the response spreadsheet in the previous step, a new tab was added. In my example below, it is named “Form Responses 2”.In order to get the formulas in the several tabs to work with your data, we need to copy the data from the new tab (Form Responses 2 in my case) to the “Form Responses 1” tab. This is how to do this:

      1. Open the “Form Responses 1” tab
      2. Delete all the data in this tab. Just click in a cell, Command-A and hit the delete button.
      3. In cell A1 of the Form Responses 1 tab, enter the following. If necessary, update the ‘Form Responses 2’ part with the name of the new tab in Step #3 above:

        =QUERY(‘Form Responses 2’!A1:T,”SELECT *”)


    This formula imports everything from the Form Responses 2 tab into the Form Responses 1 tab from which all other formulas pull data.

  6. Now, in the spreadsheet’s “ManagementData” tab, type the number of holes for your course in B1.
  7. Still in “ManagementData” type team names in cells B2:K2 (Currently Group One, Group Two…) up to 10 teams, deleting any leftovers.
  8. Under each team name, type each team’s member names (Currently Dave Archer, Matt Quade…)up to 10 golfers per team, deleting any leftovers:
  9. Once all players names have been entered, copy the alphabetized list in column M of the ManagementData tab and in the form, paste these into the answers list for the “Name” question. This is critical!:
    1. Copy all of the names in the alphabetized list (M2:M? in ManagementData)
    2. In the form, delete all but the last name listed in the Name question.
    3. Highlight that one remaining name and “Paste” the names you just copied.
    4. The only choosable responses to the Name question should be the golfers you just pasted. If not, edit them as needed.
  10. Your tournament should now be ready to roll.
  11. “Send” the form to your golfers and watch the results in the “Leaderboard” tab of the spreadsheet.
  12. If you share the spreadsheet with your golfers, PLEASE only share it as “read-only”. If people who don’t know better start going in trying to correct scores on their own, they’ll screw it up in an unrecoverable fashion.

Troubleshooting

Problems? Let’s look at what might be happening.

  1. If you have extra names showing up in your form, you prolly didn’t follow steps 9.1-9.4 exactly right. The short version is that in column M of the ManagementData tab, you should see an alphabetized list of your golfers’ names. An alternative method of getting where you need to be is to copy this list to the clipboard, go to edit your form, click in the first name in your “Name” choices and “paste” your names. Now, just go through your list and delete any duplicates or incorrect golfer names.
  2. Still stuck? Well, just leave a comment on this post. If I’m able, I’ll get back to you asap. If you’re willing to make me an editor on your form and sheet, I can probably help fix it for you.

AP Chinese and Japanese Exam Setup on Non-English Installed Windows

Intro

In November 2018, I emailed the College Board’s AP Chinese & Japanese technical support staff to clarify a note on the 2018-2019 AP Coordinator’s Manual stating that Apple computers would not be supported for use on the AP Chinese (or Japanese) exam (See “Note:” on page 127 of the manual). The response was that Apple computers have never been supported and that test sites are expected to use native Windows computers exclusively.

Our solution for the 2019 exam is to rent 40 Windows 7 Ultimate laptops from a shop in the Yongsan Electronics Mart. In December 2018 we rented one laptop to test the setup and we ran into some difficulty. It seems that if Windows was installed with an non-English “Install Language”, the AP C&J Setup CD may be unable to auto-install the Input Method Editor(s) needed for the exam. This becomes evident once running the sample tests during which the IME settings fail. We had great success following the steps below prior to running the AP C&J Setup CD.

[Note: We found that the install language for our laptops was Korean. This is found by looking in the Windows registry for
HKEY_LOCAL_MACHINE\SYSTEM\CurrentControlSet\Control\Nls\Language
On our systems, the value of this key was 0412 (for Korean) and not 0409 (for English)

Go through the IME and Headset steps below before running the AP C&J Setup CD. 

Chinese Language Input Method Editor (IME) Settings

The language needs to be set to English and the following keyboards need to be installed in Control Panel > Clock, Language, and Region > Change keyboards or other input methods. Under the “Keyboards and Languages” tab, select “Change Keyboards” and click “Add”. Select the following keyboards.

  • Chinese (Simplified, PRC)
    • Chinese (Simplified) – Microsoft Pinyin ABC Input Style
    • Chinese (Simplified) – Microsoft Pinyin New Experience
    • Chinese (Simplified) – US Keyboard
  • Chinese (Traditional, Taiwan)
    • Chinese (Traditional) – New Phonetic
    • Chinese (Traditional) – New Quick
    • Chinese (Traditional) – Phonetic
    • Chinese (Traditional) – Quick
    • Chinese (Traditional) –  US Keyboard
  • Japanese (Japan)
    • Japanese
    • Microsoft IME

USB Headset Setup

We also needed to change a few Sound settings to get our headsets to work properly. If you are following this at another school, you might want to do the same.

Connect the Koss CS-100 headset to the PC and open the sound settings (Control Panel > Hardware and Sound > Sound > Manage audio devices) Under the “Playback” tab, select the “USB Audio Device” and click the “Properties” button (Speaker Properties). Select the Levels tab, unmute any muted setting, move any volume sliders to the middle, and click the “OK” button.

Under the “Recording” tab, do the same as above for the microphone levels.

AP Chinese and Japanese Setup CD Steps

Once the above settings are complete, it’s time to run the AP C&J Setup CD, following the prompts. Afterward, we ran the sample exam and had no issues with typing or audio levels.


Resolve issues preventing installation of MacOS

I recently tried installing a fresh copy of MacOS Mojave on a student’s MacBook. After selecting the “Install MacOS” option, I received a message saying “This copy of the install MacOS Mojave application is damaged and can’t be used to install MacOS.” For some reason, this seems to be caused by an incompatible time showing in the system. There are similar error messages that seem to be resolvable by the same method. These messages include:

  • The installer payload failed signature check.
  • This copy of the install MacOS Mojave application can’t be verified. It may have been corrupted or tampered with during downloading.

To resolve the issue, restart, booting to your install flash drive, connect to WiFi, and run the Terminal app from the Utilities dropdown. In Terminal, enter the following:

ntpdate -u time.apple.com

Then try installing MacOS.

Popular sheets formulas

Just a collection of formulas I use from time-to-time in Google Sheets.

Query two sheets to find rows with a cell matching another cell’s value.

In this case, I was looking up employee type (Admin, teacher, support) in column I (Col9) by finding the email address (Col2) that corresponds to the email address in the current sheet’s column (K) and row (2).

=QUERY(IMPORTRANGE({"##### URL of first Google spreadsheet with data . ####","AllFaculty!A$2:M");>IMPORTRANGE("##### URL of second Google spreadsheet with data . ####","AllAdmin!A$2:M")},"Select Col9 where Col2 CONTAINS '"&K2&"'")

Get Unique PowerSchool parent email addresses from mother, father and guardian email fields.

We export parent email addresses out of PowerSchool using the cnt1_email, cnt2_email and guardianemail fields from the Students table. This often results in duplicates as cnt1 & cnt2 are often both in the guardian field and sometimes even the cnt1 & 2 fields have 2 addresses separated by a comma. To get the unique values, we use this little gem which assumes the three exported fields land in columns D, E, & F.

=TRANSPOSE(UNIQUE(QUERY(TRANSPOSE({IF(D2<>"",SPLIT(LOWER(SUBSTITUTE(D2," ","")),","),""),IF(E2<>"",SPLIT(LOWER(SUBSTITUTE(E2," ","")),","),""),IF(F2<>"",SPLIT(LOWER(SUBSTITUTE(F2," ","")),","),"")}),"SELECT Col1 WHERE Col1 <> ''")))

If that’s entered in column G, then columns G-J will have only the unique addresses for each student.

If you just want all the unique email addresses for all parents, just use this in column K:

=SORT(UNIQUE({G:G;H:H;I:I;J:J}))

INDEX(MATCH): An Improvement Over VLOOKUP

Google Sheet’s VLOOKUP returns undesired results when lookup values are not present in the source data. Combining INDEX with MATCH resolves the issue.

=INDEX(TabName!C:C,MATCH(B2,TabName!B:B,0))

will find the value in column C of tab TabName of the first row where the value in B2 matches a value in column B of TabName.

MacOS Missing Admin Account

We’ve had a few student and faculty MacBooks somehow  having Standard user accounts and no Administrator accounts. After scouring the Internet, I’ve found the following steps to work well. Removing the .AppleSetupDone file makes the Mac think it hasn’t finished the startup sequence and forces it to startup as new – selecting location, logging into WiFi, agreeing to terms and conditions, etcetera, including creating a new Admin user account.
Don’t stress out when you restart the computer and it looks like a brand new machine. Your current Standard account will still be there when you’ve finished.

  1. Reboot into Single user mode by pressing and holding Cmd-S at startup.
  2. At the root# prompt, type:
    mount -uw /
    rm /var/db/.AppleSetupDone
  3. Reboot
  4. Go through the startup process. Feel free to skip signing into an Apple Account. Create a new account with a name like Administrator. You can delete this account later.
  5. Once the computer completes its startup, in System Preferences, select Users & Groups.
  6. Click the lock and enter the (new) Admin account’s password.
  7. Click on your Standard account and check the “Allow user to administer this computer” checkbox.
  8. Log out and log into your formerly Standard account which is now an Admin account.
  9. If you wish, go back into Users & Groups and delete the Admin account you created in step #4.


Reset Codiad password

I use a Codiad instance on my webserver to host my coding projects. Unfortunately, I had neglected to save the password for one of my accounts and Codiad has no password recovery method built in. However, as long as you can access the data/users.php file on the server, you can change a user’s password to
0da4aea08df1536477acc5ae8a1a6ab73a307c44
This is the hashed value for the password “welcome”. That is, once changed for that user, they log in with their username and password “welcome”.

That’s it. Just remember to change the password once logged in.